![]() David Hannaford's robot pages.
David Hannaford's robot pages.
Using an H bridge and PWM to control the speed and direction of the motors
In the how to build a line follower section we looked at the basics of an H bridge and saw how it can be used to control the direction of a motor, and in the section on motor speed control using Pulse Width Modulation (PWM) we saw that we can use PWM to change the speed of the motors.
So, in this page we will look at some examples using real components and full circuits.
 |
Firstly lets look at using an
L293D dual H bridge integrated circuit. This 16 pin chip
is designed to provide bidirectional drive currents of up
to 600-mA at voltages from 4.5 V to 36 V. The device is
designed to drive inductive loads such as relays,
solenoids, dc and bipolar stepping motors in
positive-supply applications and has built in diodes that
prevent the back emf from the motors causing problems. It
also has an enable input for each motor drive that can be
used to switch the current on and off using a PWM signal.
So that means that it can drive two motors at variable speed in either direction providing up to 600 milliamps to each motor. The nice thing about this chip for our purposes is that it can operate down to 4.5 volts unlike many of the other H bridge chips available and it has back-emf protection built in. |
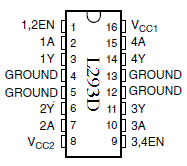
Looking at the pin connections we have the following:
Pin 8 (Vcc2) The positive voltage for the motors - from 4.5 to 36 volts
Pin 16 (Vcc1) The positive voltage for the logc circuit typically 5 volts - actually from 4.5 to 7 volts
Pins 4,5,12and 13 (Ground) These 4 central pins all go to ground and act as the heat sink for the device
Pins 3 and 6 (1Y and 2Y) Provide the outputs to each side of motor 1
Pins 11 and 14 (3Y and 4Y) Privide the outputs to each side of motor 2
Pins 2 and 7 (1A and 2A) Control the direction of motor 1
Pins 10 and 15 (3A and 4A) Control the direction of motor 1
Pin 1 is the PWM input to control the speed of motor 1
Pin 9 is the PWM input to control the speed of motor 2
So we have 4 pins to ground, one to our battery positive supply and 1 to our 5 volt regulated supply. We also have 4 direction control inputs, 2 PWM speed control inputs and 4 motor drive outputs. The 4 direction control inputs and the 2 PWM inputs will come directly from our microprocessor and are logic level circuits that treat everything above 2.3 volts as being a high logic signal and everything below 2.3 volts as a low logic signal. This means that it will work with outputs from either a 5 volt or a 3.3 volt microprocessor.
The two control signals for each motor control the voltage at each side of the motor. So if 1A is high and 2A is low the motor will turn one way. If 1A is low and 2A is high the motor will turn the other way and if both 1A and 2A are either high or both low then there will be no power to the motor. The same logic applies to control inputs 3A and 4A for the other motor.
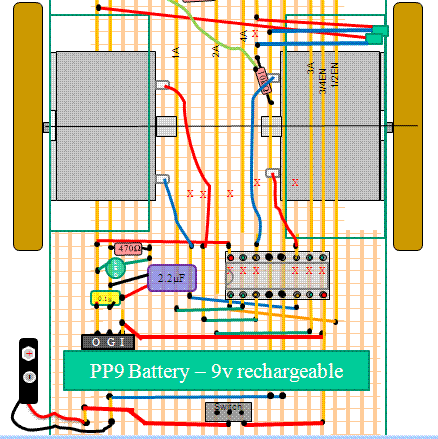 |
Here we see a stripboard layout
that utilises the L293D with pin 1 being bottom left of
the device as shown. Note that the view is from the top,
with the copper strips below and where a red X is shown there is a break
made in the strip at that point. The diagram also shows a 9 volt battery connection, an on/off switch, an on/off green LED indicator with 470 ohm series resistor and a 3 pin 5 volt L7805CV voltage regulator marked O G I representing the output, ground and input pins. It has input and output capacitors of 2.2 and 0.1 microfarads, but almost any small values will work. Power from the on/off switch goes directly to the positive voltage supply pin 8 and a red lead from here feeds the input of the voltage regulator whose 5 volt output is taken to pin 16. The 4 motor leads are shown as red and blue pairs, one set coming directly from pins 11 and 14, and the other set via green link wires from pins 3 and 6 All of the control and PWM inputs are fed down the board to the other side of the motors where they will be connected to the relevant output pins on a processor. |
Even without a processor connected you can check that this has been set up correctly by putting either 5 volt or ground voltages on the 1A and 2A inputs to check that motor 1 turns both ways, and you can do a similar thing on the 3A and 4A inputs to check motor 2 turns both ways. If there is no signal on the enable pins they will automatically float to a high state enabling the motors to turn at full speed when the dircetion control inputs are applied.
Another useful dual H bridge devicefor small robots is the L298N. This can handle a higher power than the L293D, but it does not have built in protecton diodes so these need to be added externally.
You can also build your own H bridges using MOSFET transistors which are particularly good at switching heavy DC loads - a circuit wil be added here shortly.