![]() David Hannaford's robot pages.
David Hannaford's robot pages.
Using an Arduino processor and development environment
Arduino is an open source microprocessor platform that makes it easy to develop and implement microprocessor based systems. By bringing the microprocessor input and output ports out to easily conectable pins on a small board, and providing a bootloader so that programs can be downloaded and monitored across a serial or USB cable to a PC, you can write and try out programs straight away with little or no electronic circuit skills.
There are several Arduino boards available as well as various daughter boards that fit onto them to give additional functionality. These are available from Arduino themselves but also many other suppliers of equivalent boards. A quick search on ebay will usually find many available from between about £12 and £30.
The programs are written using the Arduino development environment which is also free and can be downloaded for most PC platforms here.
| Follow the download and install instructions, and you should end up with an Arduino icon on your desktop like this: |  |
Clicking on the icon will start
the Arduino environment and after a short while the
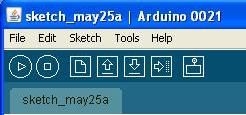
Sketch window will open. This is used to write, compile
upload and monitor programs. At the top of the window you
will see some menus and icons like this:
Clicking on the first icon (Verify) will compile the program and check if it is syntactically correct. Any errors will be highlighted in the black area at the bottom of the Arduino window. The second icon (Stop) will stop a running program. The third icon (New) will clear the existing program and get ready for a new pogram to be written. The fourth icon (Open) will load an existing program into teh development environment. The fifth Icon (Save ) will save an existing program The Sixth Icon (Upload) will recompile the program and transfer it across the cable from the PC to the Arduino board where it will run The final icon (Serial Monitor) displays on the PC any data from print statements in the program
|
 This program has two sections like all Sketch programs - a setup section and a loop section. Setup will be run just once and tells the program which pins are being used for what inputs and outputs. The statements inside "Loop" will be run continuously, in this case switching the LED on and off ever second forever.
|
There are lots of examples available. Start with the Help topics then look at the examples in the File menu and you should be able to get something running prety quickly.
Some Arduino line follower code is given here as an extra example.
Good luck.